
A Manual for Manual Camera Settings
I have had a few friends ask me for pointers on working in manual mode. And really, the first advice I can give is to just PLAY. Get comfortable with your camera, and understand how it reacts to light and different situations – IN NON-STRESS TIMES. This is very important! Don’t try to capture Christmas photos or the championship game in manual mode until you are really at ease with it. Use manual mode when your kid is in the tub. When they are kicking a ball around in the backyard. When your roses look their best in that golden evening light.
But, when I said the above to the aforementioned friends – it was not enough. Hmpf! So, here is a step-by-step guide to starting out with your manual mode. And strictly my opinion! I welcome any other tips, tricks and advice from all you other photo fiends out there!
So, set your camera to manual mode and let’s go!
Oh. Here’s a P.S. before I even start: This post assumes you have a DSLR. But many of these principals apply to a point and shoot with manual settings! This post also assumes you are not using a flash. Because flashes are evil!
1. Decide your f-stop.
To be honest, steps 1 and 2 will kind of ebb and flow in importance depending on the light and your style as a photographer. But personally, I am a big fan of Depth of Field (DOF) and Bokeh, so usually f-stop guides my decisions. The lower the number of your f-stop, the larger the opening of your lens as it snaps the photo, the more light it lets in and the SMALLER the depth of field. Meaning, the smaller the f-stop, the MORE blurry background, foreground or whatever you are NOT focusing on. I almost always shoot in 2.8. Almost always. Unless I have a large group of people where I want everyone to be in focus, or I am shooting a grandiose landscape scene, or *maybe* if I am shooting a sporting event. That last one is a matter of preference. I may miss some of the action my using a low f-stop at Declan’s soccer game, but I am happier with the shots I do get, so again, personal preference. The ability for f-stop settings is entirely dependent on your lens. Some do not go as low as even 2.8. And I have a 1.8 lens that gets amazing DOF but is really hard to focus at times, so I only use it when I have time to play.
 2. Decide your ISO.
ISO is film speed, which is clearly pretty much faked on digital cameras. Like how we used to have to buy 200 or 400 speed film? The higher the ISO, the lower light you can shoot in, but the more noise (graininess) you risk in the shot. You will really start to visibly see noise at about 800 ISO. Which is not necessarily bad, and can add to the mood of the shot. Also, the lower the ISO, the more robust color you will get. Personally, I prefer vibrant colors, so I will gauge the light and try to keep my ISO as low as possible, and only keep bumping up the ISO as the light fades. But sometimes, the light just determines everything for you, and you need to bump that ISO way up to capture a moment you would otherwise miss.
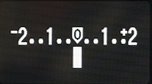 3. Set your shutter speed.
This is how fast the camera will take the shot. After you have set the two settings above, look through your viewfinder and you will see your lightmeter. It should looks something like this> If you depress your shot button halfway, the bottom bar should wiggle around, reading the ambient light in your shot. Your goal is to adjust your shutter speed so that the bottom bar lines up with the zero in the middle. Well, mostly. Some cameras shoot dark. Or maybe you like your shots dark, or light. This is where you continue to play, and bracket your shots (meaning take one at zero and one above and one below). The good news is, these are YOUR photos, YOU make the decision as to how they should look.
Still not right?
 4. Adjust your White Balance.
White Balance is where the camera looks out at a scene and takes a guess at what “true white” is, and adjusts all the other colors accordingly in the shot. And in general, the “AWB mode” – or Auto White Balance – is quite good. But maybe you are in a room with fluorescent lights that throw a green cast on everything. Or the cloud cover is making a weird tone on people’s faces. Go into your White Balance settings and fire off a few shots in different settings to find one that works better.
5. Have fun. And share your results!
You May Also Like

This article has 23 comments
Comments are now closed.
LOVE THIS! Going to print and try it out.
Thank you! Thank you! Thank you! Thank you! Thank you! Thank you!
Um… Point, click.
That’s as far as I get.
But if you want to talk about seam allowances and the differences between ironing and pressing, let me know. 😉
I need to get braver with manual mode. It has always scared me, and I don’t know why. Maybe because I actually have to think.
I was just working on a tutorial. Maybe I will just link to you now. Very well written.
I too thought Flashes were nothing but pure evil…a hypocritical device that actually makes photos DARKER (most of the time) when you use the flash. It’s been the most frustrating part of my camera addicted life…stupid flash ruining a perfectly good photo- if only the kid would SIT STILL so I could turn it off. Anyway, I digress….
I thought this until….yesterday. Yesterday was the glorious day that I received my ProPhotoRental prize gear in the mail!! WEEE!!! For Round One, I rented a Fish-Eye Wide-Angle Lens (DRooooooL) and a SPEEDLITE 580 EXII (the flash to be worshiped!). It is AMAZING to say the least and it makes me use LOTS OF CAPS and exclamation points!!! I can’t say enough about it and I haven’t even left my house with it. Here are the flash comparisons and tests in Av and Auto mode…what a difference a good flash makes!
I had to take a class and read a number of books AND play before I really felt like I had the hang of it. I’ve gotten similar questions and I usually tell them to read the manual and to start out by playing in one of the priority modes first. The reciprocal nature of the aperture can be hard to explain to people. Even PW took an entire post to try to explain it. But you have simplified it nicely.
Now I’ll just point my friends here 🙂 Thanks.
Great post.
Thanks! I am going to go have that tatooed on my arm! I have so much trouble grasping those simple concepts, it is embarrassing!
Thanks for the simplified version of things to try.
I can’t wait to play around with this!
A great simple explanation! THANKS!
mee … THIS is awesome …. THANK YOU!
Naomi from SS-Cleveland
I too printed this out.. it is a great simple reference.. I also favorited this in my reader!!
YAY! I so so so need to play with my white balance. I have taken a hundred photos on a sunny day then when I download them – they’re all white and they suck. I don’t have editing software so my options are pretty limited for a fix.
Anyway, I saw some cool vegetable shots on another site and I’m thinking I’ll try some stuff with food. I’ll share.
Thank you so much for this post!
Thank you. THANK YOU.
One follow up question, if I may. For casual photographers, is it worth getting a DSLR? If so, why? (Because I have to explain it to Kyle.)
Perfect timing for this post! I remember you did something similar a while back, and was going to email you to ask for it 🙂 Xtina and I were *just* talking about some of this yesterday. I have just ventured into the creative settings, thanks to a class I just took, and am very intrigued, but have SO much to learn.
Thanks again for posting this!!
That is a great post. Thank you so much for sharing it with us.
I really appreciate it!
forwarding to like 50 friends. thanks.
I love this! I just got a Canon DSLR camera for my B-day and I am trying to learn to work the manual mode.
I now finally understand the ‘f’ thingie.
Great post!
I spent too much time playing with white balance this weekend on my husband’s new Nikon N-90. Next challenge: actually remembering how to do it…. And thanks a million (zillion) for the PBN/Blurb Halloween photo contest recognition. I’m just figuring out this whole blogging thing, and this was very exciting and humbling. Thank you.
AWESOME. Maybe tomorrow won’t be nasty and I can go play with my camera and try to make this work “in the field”…makes sense in my head…but now I just have to do it…
Thank you!
great post.
I was going to say the same thing as your anonymous writer! Thank you so much. I’ve taken a class, and it never made any of it as simple as you just did. Now I’m off to practice. I love pictures with the background blurred and haven’t known how to adjust my f-stop. Thanx again. T